Finding Your Style
Finding your style of photography can be really daunting, and in a world where everyone and their brother is claiming to be a photographer, it can be difficult to know where you fit, how you are different, and what feels true to yourself and your vision as an artist.
You’re “Sense of Style” stems from your heart, how you specifically see the world, and the ways you consistency show that viewpoint. But before we can create consistency, we have to explore through creativity, to discover what we personally like - and don’t like. Those discoveries only need to feel good to YOU. My choices may be different, because I see the world differently. The world is big enough for everyone’s style, and we all need to celebrate our views, whether we are the same, similar, or different. It’s the beauty of being an artist.

I wanted to share a few tips and tricks that helped me develop my equine portrait style, and how I am continuing to grow within that style.
I’m going to use equine portrait (black background) images as examples, but know that any of these tricks, tips and examples can be applied to horse & rider or even canine photoshoots too! Equine portraits are easiest, as the background is being replaced (so we can ignore it!) and the lighting is the same throughout all sessions, so we’ll only be looking at the poses, and how to define your style through that.
Let’s look at a handful of photographs I took while teaching an Equine Portrait Workshop. We’ll be comparing the images, asking questions, and determining what we like, don’t like, how we can make positive changes, and from there, determining what our style will look like through the images we gravitate to. I encourage you to practice the same exercises with your own photos too!

Try photographing from a different angle.
If you love a pose, change it up and try photographing it from a different angle. This will help build a variety of images you can capture within a single pose, and may provide you with a new angle that you love MORE!
When looking at the original pose (in example, the left image below) you love vs the new angle of that pose (in example, the right image below) ask yourself…
What do you like about the new angle?
What don’t you like about the new angle?
Is it as strong as the original angle?
Is there a way to either crop, or move in closer to photograph details of this pose that may be a complimentary option to the original angle?
Do you need to adjust your angle again to find a better, more pleasing option?

Try photographing from different perspectives.
Once you have a pose figured out, try photographing it from different perspectives.
How does that change the overall story or emotion of the image?
Does it highlight areas of the horse you want the viewer to focus on?
Does it create more curved or straight lines? How does that balance out the rest of your images you love from this photoshoot?
If you love a new perspective, are there details you could refine or change, to make that image stronger?
Would this angle make a great image as an individual portrait of the horse, or would it be a desired angle if you were to build a composition and add in another animal (ie: horse or dog)?

Shoot through the movement!
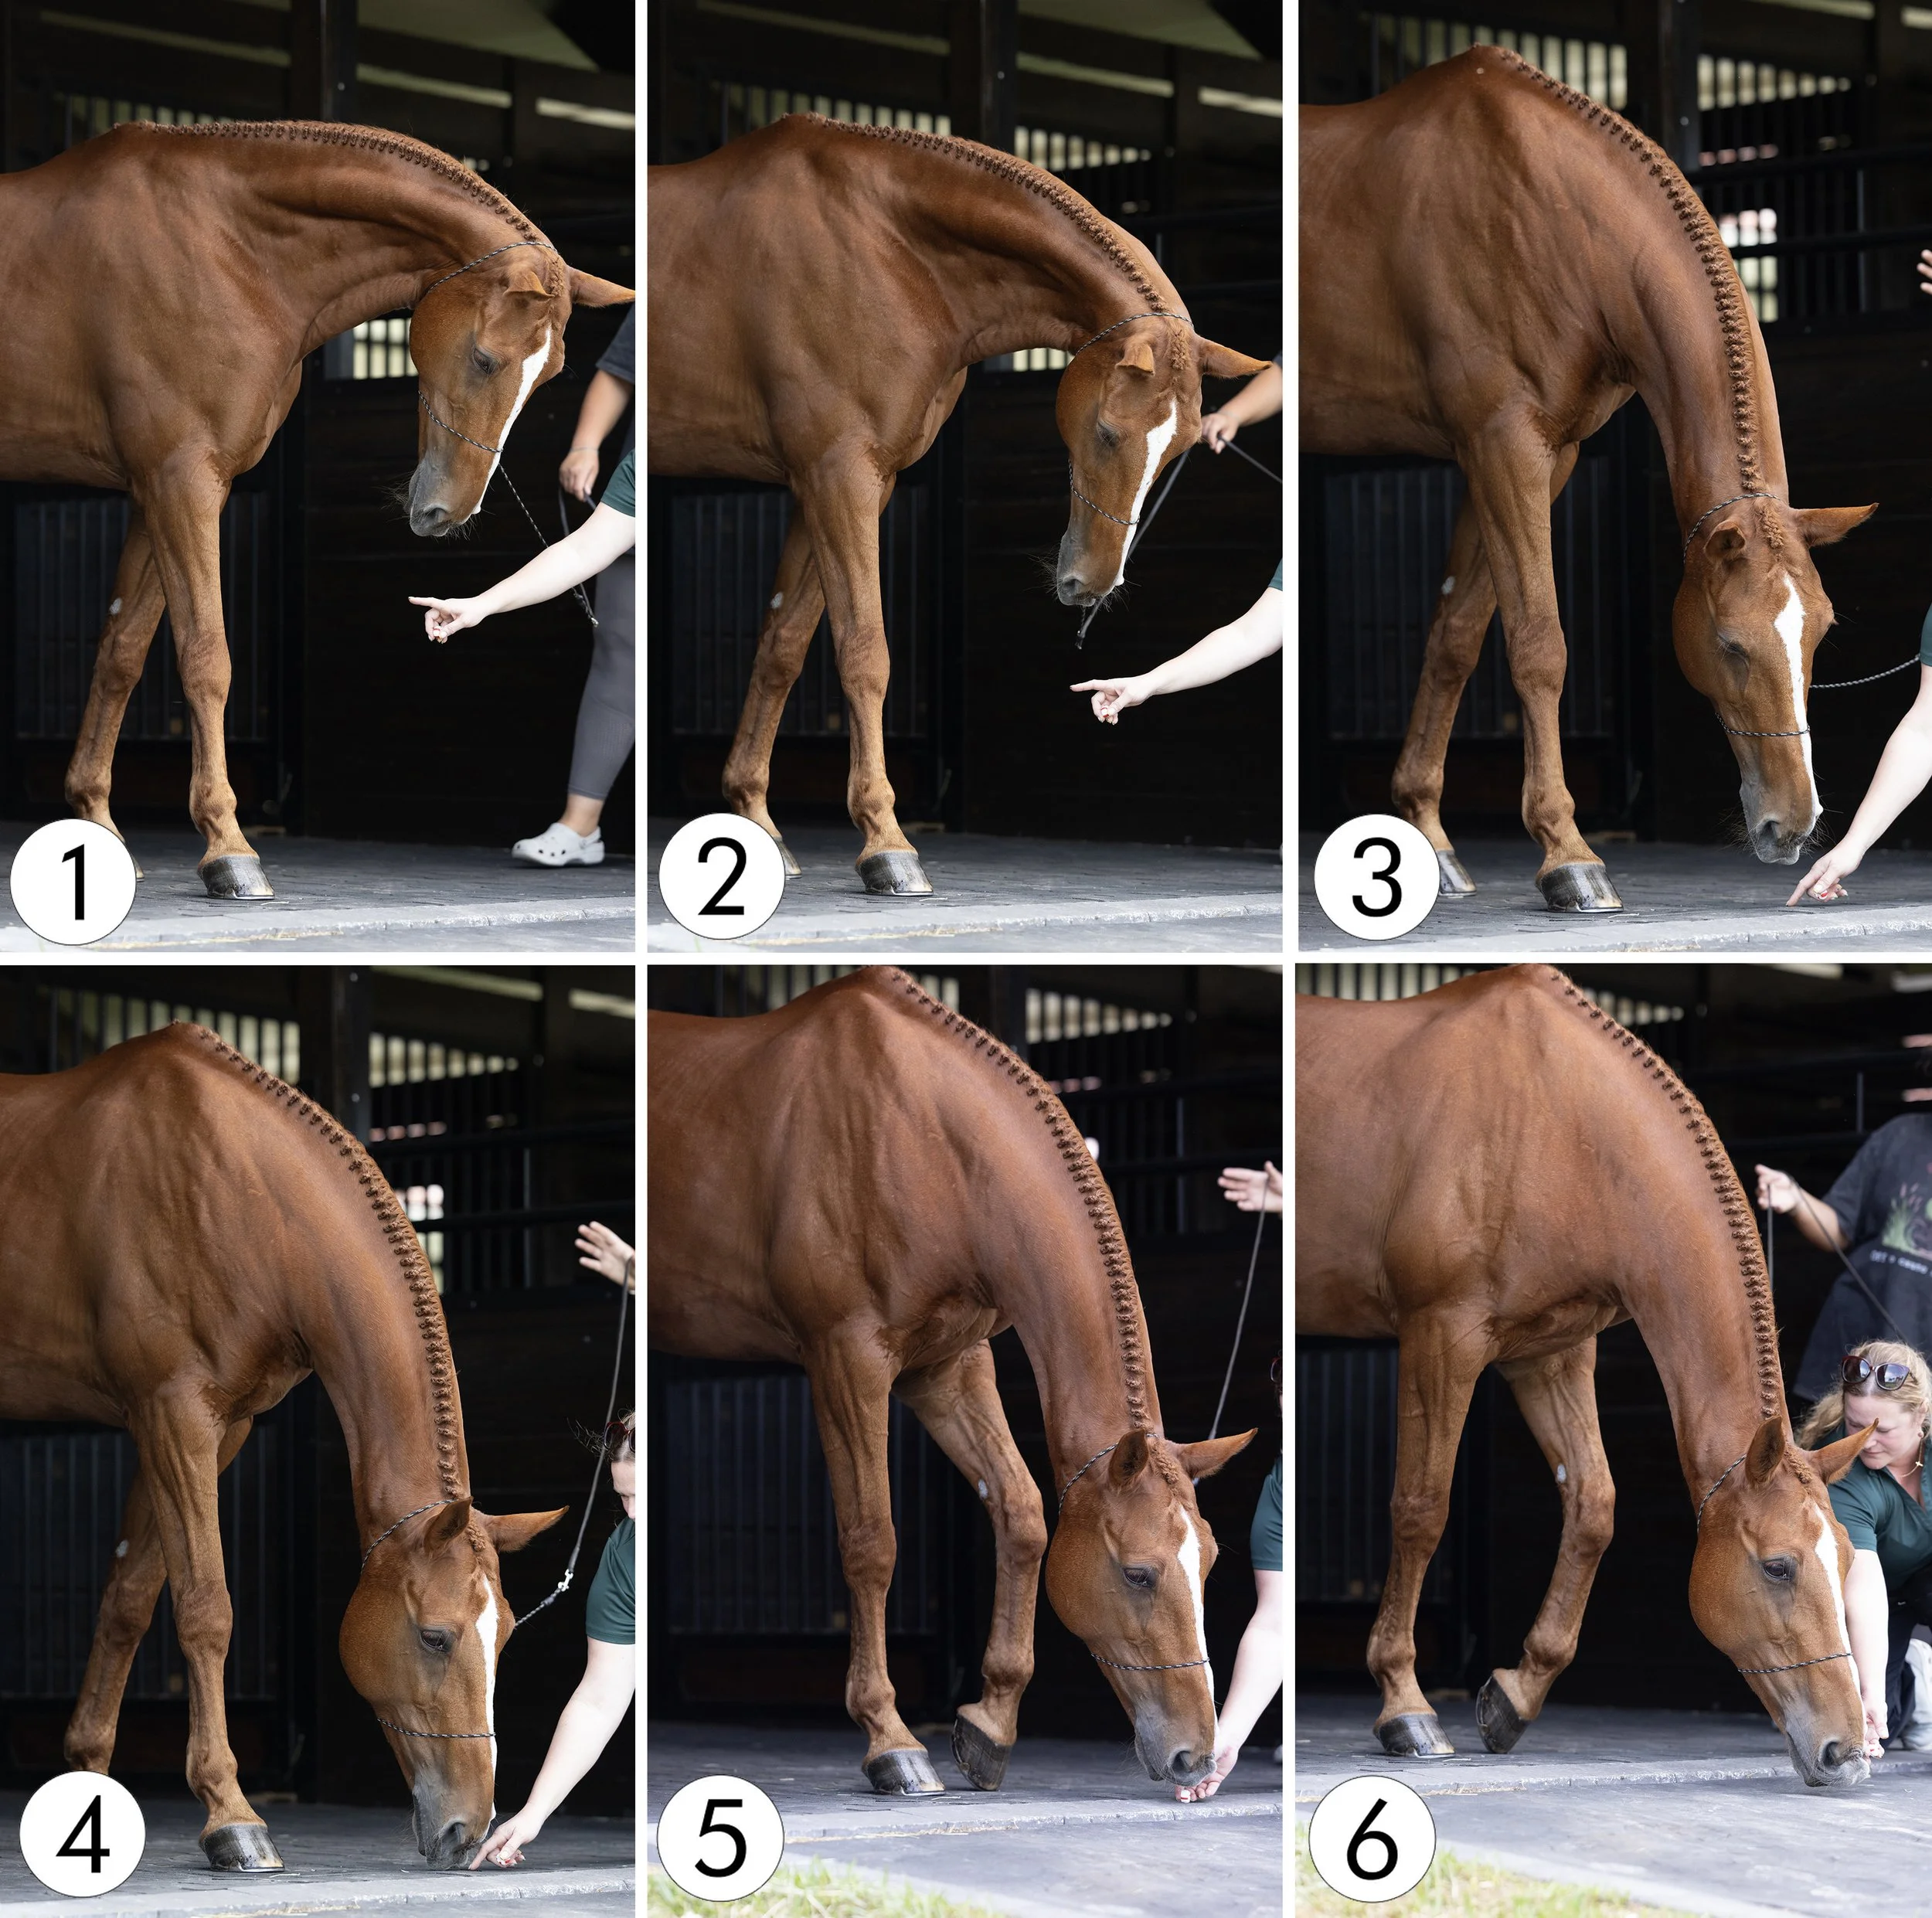
Let’s keep to the same pose, but now we are photographing it from a different angle, at a lower perspective. While your assistant is asking your horse for the specific pose, shoot through the movement. Compare the images side by side and determine what you like and don’t like about each image.
This was the start of the pose, lowering her head, and at this height, it would be better suited for a western discipline, but I like the softness of the horse’s expression.
I like how the horse’s expression is more alert and engaging, with a bit more stretch toward the ground. I also like how the front hooves are square.
I like seeing more of the horse’s facial marking, but I don’t love how far away from the hooves the horse is stretching it’s nose. The bend in the neck does make the muscles pop though!
I like how the horse’s nose is tucked in closer to the horse’s hooves, creating parralel lines between the legs, the neck, and the facial marking. This image feels more balanced, and would make a really nice vertical 1×2 ratio crop.
I like how the horse is still alert and engaging, but we now have the added movement from the step forward. It makes the overall pose wider, fitting better into a vertical 2×3 ratio crop. This pose can be a fun variation for all disciplines, but I would say this image, would fit better with western disciplines - cutting or reining specially coming to mind, where you want the head lower to balance their movement.
End of the pose. I don’t love how wide the horse looks through the chest, but this image may or may not be useable for a composition piece (could be cute if there is a small dog between the horse’s legs, and another dog or horse to the right, where the horse is reaching to interact.). At the very least, this shot can be a really soft and kind moment between the horse and your assistant, that could be a beautiful behind the scenes image, showing the kindness and love we as a team have for the client’s horses.
For my style - I like number 4 best. I think it compliments the long legs, the exquisite braid job, we can see the facial marking, the expression is soft but alert, and we have really lovely symmetry in the lines, and a balanced image - perfect for a 30×60” fine art piece! This image also compliments the other poses that have more curves.

Don’t be afraid to change it up and try again!
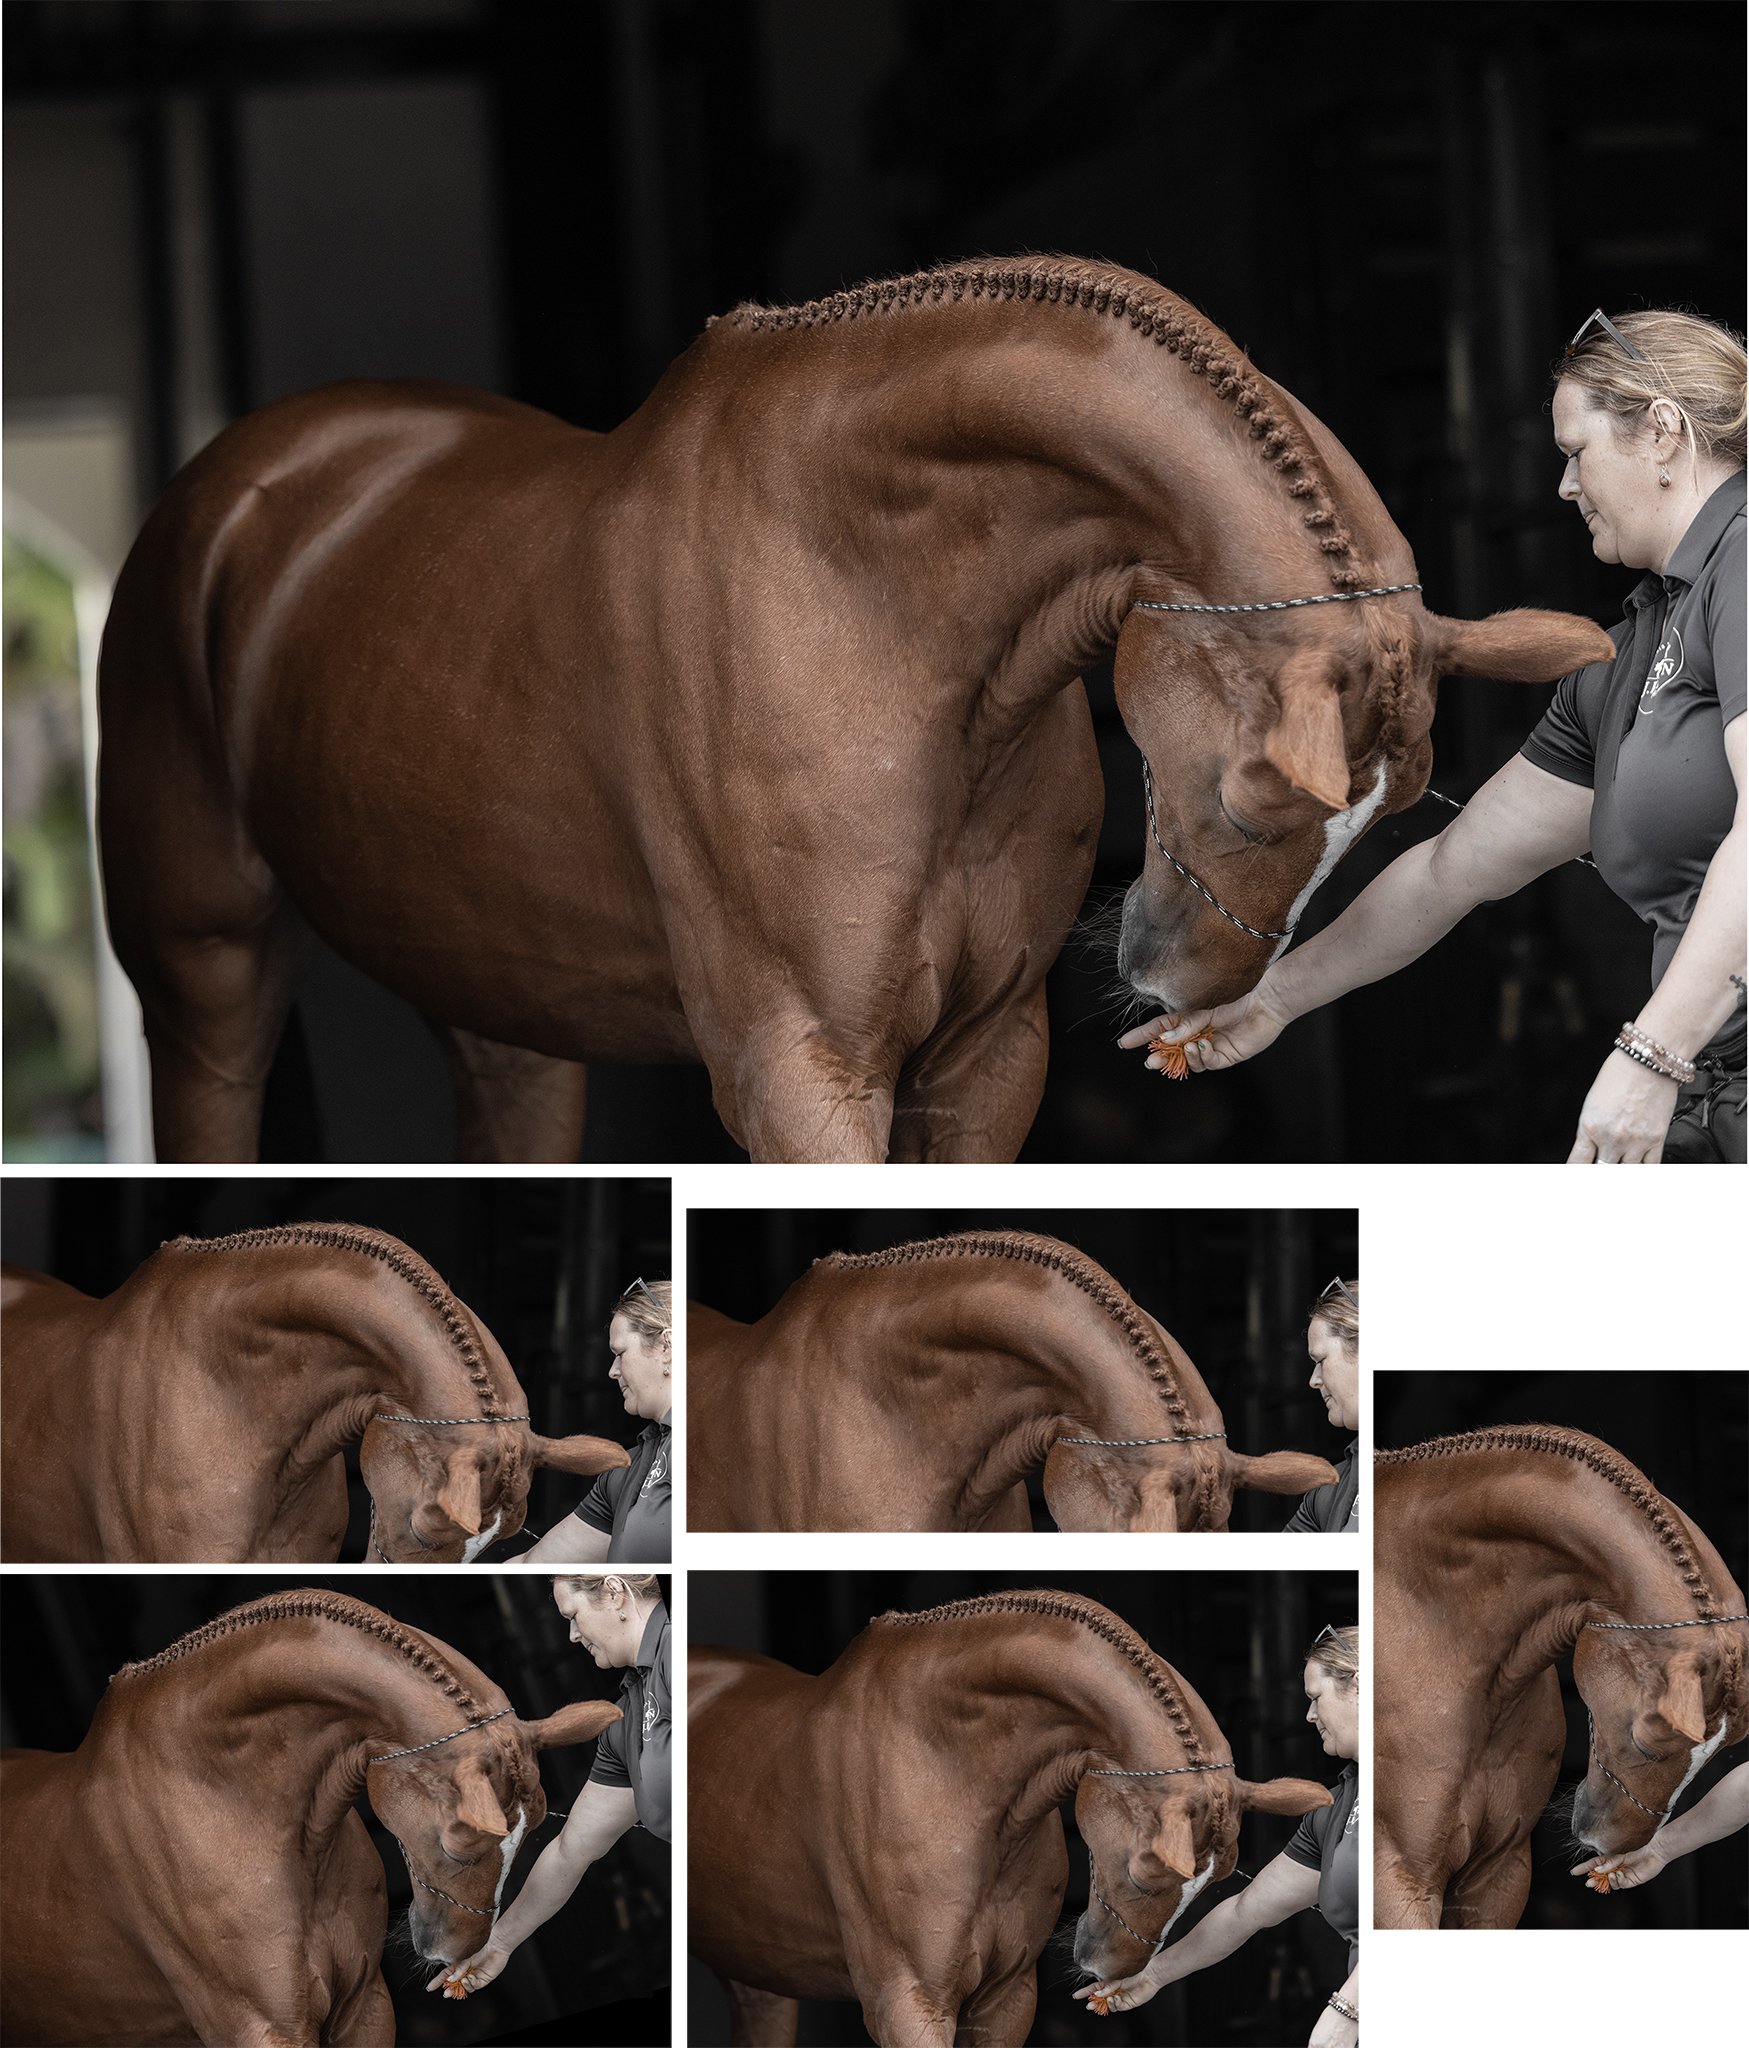
Okay, so we determined what the timing and exact image we liked best from the pose above. What happens if we change it up and have the horse start with it’s front legs not set squarely? … To avoid making the horse look as though it’s chest is wide, let’s place the leg closest to us forward, which creates a more criss-cross look, closing the chest to look narrower.
This image makes the neck muscles POP!!! Wow! This image says, “POWER” and “STRENGTH” to me, which contrasts the soft but alert look we liked previously. It would add variation to the collection of images provided to the client, and is different enough to not be duplicating the same pose twice.
We lose a bit more connection to the horse’s eye, but we get an overall softer look, and gain a better view of all the braids. This image is well balanced too.
This image is very similar to number three above! We’re able to see more of the facial marking, while still getting a great muscle definition throughout the neck. I like the eyes closed, and I think that having the legs NOT be square, balances this image better, especially since the angle of the leg closest to us matches the line of braids and facial marking, creating a bit of symmetry.
This image is VERY similar to the number four above, but it falls a bit flat in the expression, and isn’t as strong as the number 4 above, or the number three in this group.
We get a bit of movement now with the horse releasing the weight of the outside leg. It has a nice bent to it, but you can see the horse is collapsing it’s weight all on the closest leg, making the outside leg look limp. The expression falls a bit flat for me too.
The horse is now reaching further out - but we still have a limp outside leg and we lose the nice curve and symmetry of the neck, with it being broken at the poll. I feel like the horse is going to fall over at any moment… which is why I actually asked my assistant to stop and step away. It becomes a safety issue, and seeing horse’s off balance like that makes me immediately nervous - not the emotions we want to create for the viewer!
For my style - I like numbers 1-3 better. I like the contrast of strength and softness, as well as powerful muscles and a pleasing balance throughout the images. I think that any of the three would be a really nice option to compliment the same pose, photographed front a different angle, at a different timing throughout the movement.
Creatively cropping to find the ideal frame.
When you are trying new poses, are at the angle you like, and are shooting THROUGH the movement, you may end up capturing an image that really intrigues you, but you may feel as though a slightly different frame may enhance the image even more. This is where playing around with cropping can help!
First - I am currently photographing on a Canon R5, which has 45 megapixels. This size provides me with some grace when cropping, but I always want to get as close to the ideal framing in camera. Ideally, I don’t want to heavily crop, because I’ll be sacrificing data and overall quality of the image.
However - When you are experimenting with movement, and trying to find new poses, use an image and try cropping it in several different ways. This will teach you what you like (and don’t like), and how to adjust your pose, position you’re photographing from, or how your assistant is interacting with the horse.
Here are some questions to consider when cropping…
How does it change the focal point of the image?
Does it highlight different areas of the horse’s body?
Does a vertical or horizontal crop look better?
Is a crop outside of the normal 2×3 ratio more flattering?
Does this pose work for this horse’s breed and discipline, or would cropping it work for another breed and discipline you may not have considered using before?
EXTRA TIP: When you are considering different crops, save each crop as it’s own image. I like to then take a break from the photos for 24-48 hours. When I return, there is always one crop I’m immediately drawn to, and of course there is always a crop that makes me go, “WTF was I doing there??!” 😆
Here is the original image (no cropping, but some camera raw color adjustments were done to these files before saving), and five different crops I had saved to consider.
For my style - I like being able to still see the horse’s barrel and legs. I really enjoy how the leading lines in the image continuously bring you back to the horse’s face, but accent the the horse’s strong next and details of the braids. While I’m not loving how to the horse’s left ear is horizontal (listening to my assistant who was on that side), I think it having it placed in the middle of the frame creates a kind of balance. I don’t feel as though it’s necessary to have the hind end in the image, as the highlights on the coat draw attention away from the head, neck, and braids.

Communicate with your assistant!
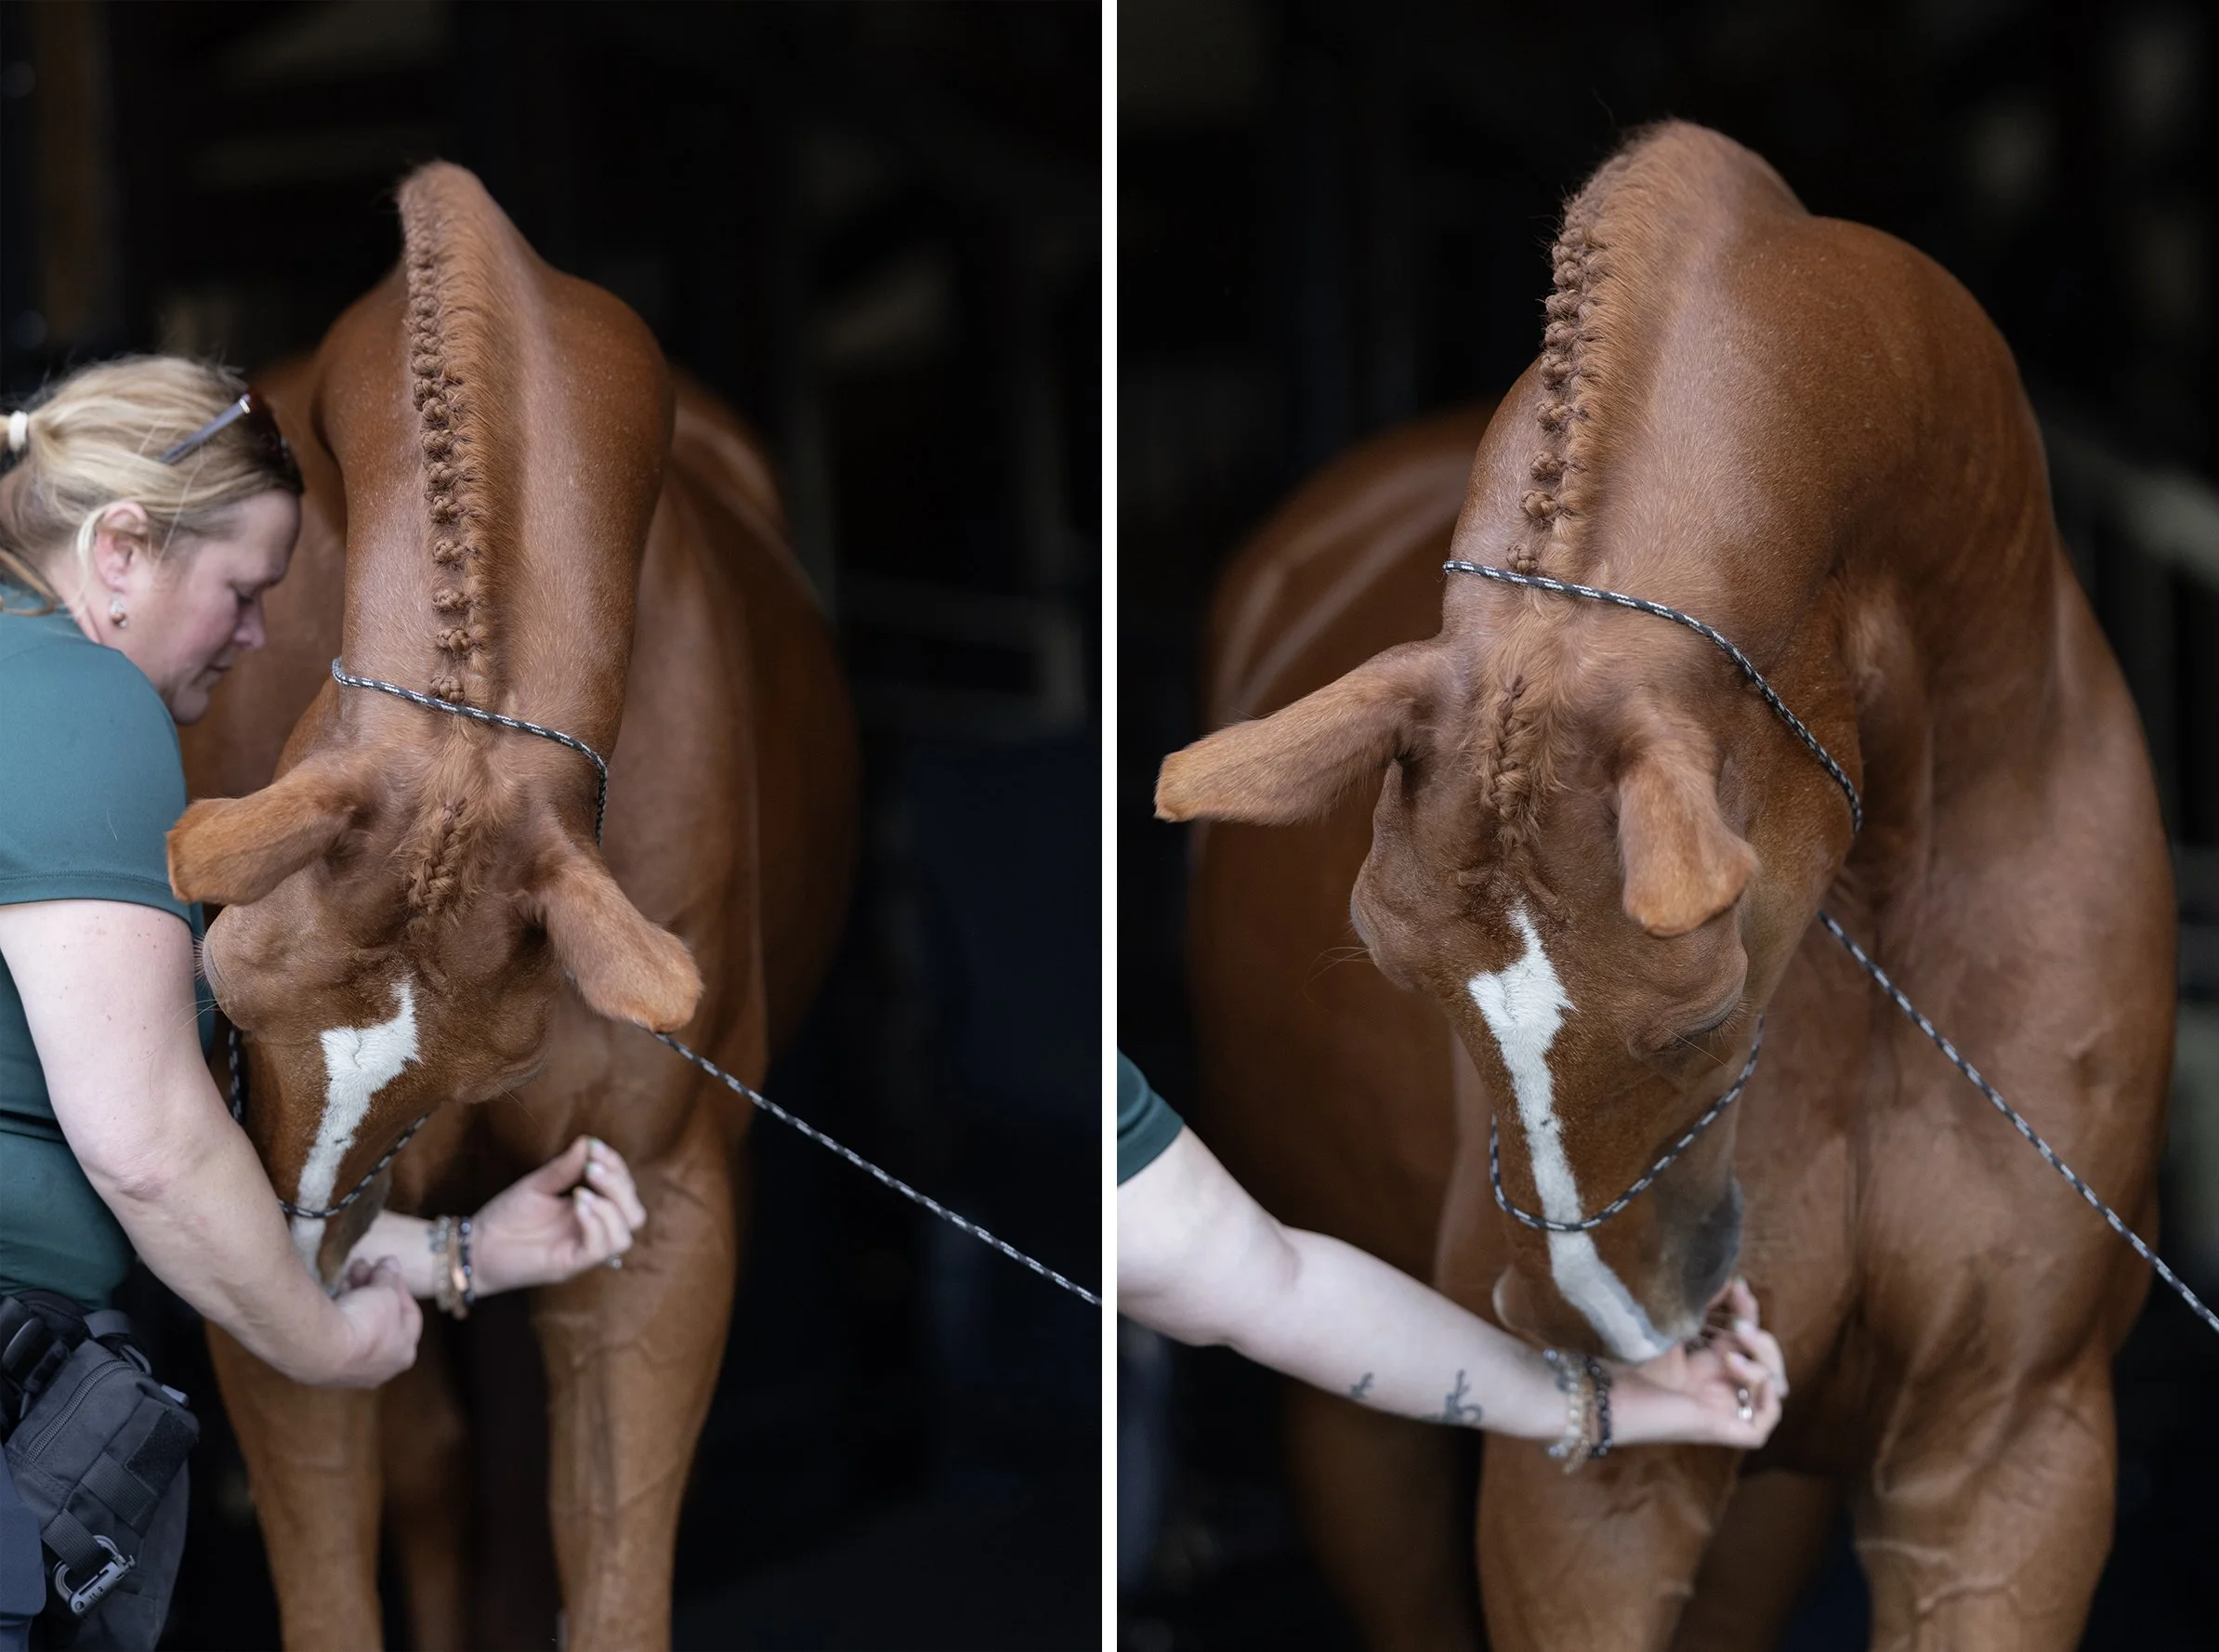
When you have established your style through your choice of perspective, angle, timing, and framing, make sure you stay constantly communicating with your assistant. They are seeing the horse at a completely different angle, aren’t sure exactly when the peak timing of your shot may be, and they may not realize that they are being counter productive to the image - in this case, being too close to the horse and blocking the horse’s face, chest, shoulder, barrel and back.
Pausing to show recognition in that your assistant posed the horse beautifully (it would have been a great shot!!), taking a moment to show the assistant the image on your camera, and working together to brainstorm how to create the same image, without blocking the horse - is going to be wildly beneficial to your success together as a team, for the client in their resulting image, and for you as an artist, able to expression your style in the best way possible!
The more curious you are with your photography, either through posing, photographing, culling and/or editing, the more you will grow. The more you grow, the more consistent you will become with your images and sense of style. Overtime, with consistency and gravitation toward everything you LOVE about your images, the more you’ll become known for that sense of style.
Next Steps
If you don’t have images from a recent photoshoot, I encourage you to dedicate time to photograph - whatever type of photoshoot your heart desires. This could be with a friend, a family member, a favorite client, or someone new from a model call.
When you upload the images, take time to really critique your images.
What do you like about each image?
What don’t you like about each image?
Can you determine what you could do different to elevate that image - either during your next photoshoot, or through creative cropping or editing?
Is this an image you love and want to recreate as much as possible?
If you responded ‘YES!’ to the last question - than you are one step closer to determining your ‘style!’
Remember your critiques, make notes for the next photoshoot if you need help remembering, and go photograph again. Rinse and repeat.
Are you finding patterns throughout your photoshoots, whether that’s through posing, lighting, lines, compositions, colors, editing, etc.? Are you able to recognize the positives within your images and the areas for potential growth?
If you responded ‘YES!’ to either of those questions, then you are on the right road - KEEP GOING! 👏🙌🏻 Overtime, you’ll build consistency, and you’ll become recognized for how you view the world, and the style - or how - you share that beautiful view with everyone.

Feeling like you need a bit more guidance?
I am happy to help! Let’s schedule a virtual mentorship, an in person mentorship, or have you join a workshop. If you prefer learning at your own pace, check out my online education (and posing guides!).